Showing posts with label with meat. Show all posts

Wednesday, February 16, 2022

Simple Hash Brown Casserole

 picture coming soon

This seems like there's not enough to it to be satisfying, but somehow it really is.

  • 1/2 lb ground beef
  • 2 tsp ranch seasoning powder
  • 1/2 C shredded cheddar cheese
  • 1/2 C cream of potato soup (from a 10.5 oz can)
  • 1/4 C milk
  • 1 C shredded hash brown potatoes, thawed
  • salt and pepper to taste

1.  Preheat oven to 350°F.   In a medium skillet, brown ground beef, drain.  Stir in ranch seasoning.  Transfer beef to a 6"x9" glass casserole dish and flatten across the bottom.
2.  In a medium bowl, combine cheese, soup, milk, hash browns, and salt and pepper.  Spoon mixture over beef in casserole dish, and spread to cover.  If desired, top with extra cheese.  Bake at 350°F for 22-25 minutes.  If desired, for the last few minutes of cooking, switch to broiler setting to get a crispier topping.

Robyn's notes: to thaw the hash browns, line a bowl with paper towels, scoop the hash browns into the paper towels, cover with another paper towel, and either set aside on the counter for a few hours or microwave for 15-20 seconds.  The hash browns don't need to be warm, just not frozen.

*** 3 Stars: Good. At least one of us liked this enough for me to make it again, but not often

Thursday, January 20, 2022

Cheddar Bacon Ranch Burgers

I generally make these as sliders, simply because the inexpensive buns I get from the market here are really small, so it just makes sense to do four little burgers instead of two big ones that don't fit the buns.

  • 1/2 lb ground beef
  • 1/4 C shredded sharp cheddar cheese
  • 3 slices bacon, diced and cooked
  • 2 tsp ranch seasoning powder
  • 4 slices sharp cheddar cheese
  • 4 hamburger buns

1.  In medium bowl, combine beef, shredded cheese, cooked bacon, and ranch seasoning.  Form into four patties.
2.  Place burgers on grill and cook approximately 4 minutes per side.  Just before removing burgers from grill, place a slice of cheese atop each patty to melt.  Place patties on buns and top with preferred additions.

Robyn's notes: I use a George Foreman Grill for this recipe, so it's a cook time of four minutes total, not four minutes per side.  I've made these little sliders several times, there's something about that punch of ranch seasoning and the bacon and cheese being inside the burger that's very satisfying.

*** 3 Stars: Good. At least one of us liked this enough for me to make it again, but not often

Friday, December 10, 2021

Chicken Quesadillas

I love chicken quesadillas, but at home I always used to simply add chunks of chicken to cheese in a tortilla and, sorry, microwave it.  The sauce on this is quite tasty and the whole thing is a great way to use up leftover shredded chicken.

  • 1/2 C mayonnaise
  • 1/2 tsp taco seasoning
  • 1/8 tsp garlic salt
  • 1 tsp hot sauce
  • 4 flour tortillas
  • 1 C shredded Mexican cheese blend
  • 1 C shredded cooked chicken

1.  Whisk together mayo, taco seasoning, garlic salt, and hot sauce.  Spread mixture on one side of each tortilla.  Sprinkle cheese over sauce on half of each tortilla, then top the cheese with chicken.  Fold the other half of the tortilla over the side with cheese and chicken.
2.  Heat in microwave for 20 seconds, then saute in a skillet over medium heat for 3-4 minutes per side, until crispy but not blackened.

Robyn's notes: These can also be made with two full tortillas sandwiched over each other, of course, but I find quesadillas easier to flip when there's a fold on one side, so nothing can slide out that direction. It's also a good recipe for a countertop grill, which is what I used for the photo. In that case, don't bother microwaving first.

*** 3 Stars: Good. At least one of us liked this enough for me to make it again, but not often


Saturday, August 14, 2021

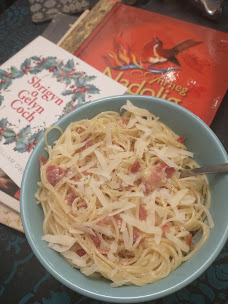
Pasta Carbonara


  • 1 large egg and 1 large yolk, room temperature 
  • 1 clove garlic, minced 
  • 1 ounce (about 1/3 packed cup) grated Parmesan 
  • Salt and Coarsely ground black pepper to taste 
  • 2 Tbsp water 
  • 2 ounces of pancetta or bacon, diced 
  • 6 ounces spaghetti

1.  Place a large pot of lightly salted water (no more than 1 tablespoon salt) over high heat, and bring to a boil.
2.  In a mixing bowl, whisk together the egg, yolk, garlic, and Parmesan. Season with a pinch of salt and generous black pepper.
3.  Meanwhile, heat large skillet over medium heat, add water and pork, and sauté until the fat just renders, on the edge of crispness but not hard. Remove from heat and set aside.
4.  Add pasta to the water and boil until a bit firmer than al dente. Just before pasta is ready, reheat pork in skillet, if needed. Place a stainless steel mixing bowl under colander, then drain pasta and let the draining pasta water heat the bowl.  Discard all but 1/4 C of the water, setting that aside, and use the empty heated bowl to combine all ingredients.  Stir for a minute or so.  Add some reserved pasta water if needed for creaminess. Serve immediately, dressing it with a bit of additional grated cheese and pepper.

 Robyn's notes: I have been working on my recipe for Pasta Carbonara for at least a year and a half.  The first time I made it, following a recipe from a well-regarded publication, I got pasta in scrambled egg.  So I did some research, and have been making slight tweaks to my recipe, trying to get it perfect.  I use very little of the pasta water, generally, but that's going to depend on taste and local conditions.  If desired, after the pork fat has cooled slightly, whisk one or two tablespoons, in a slow stream, into the egg/cheese/garlic mixture.

**** 4 Stars: Very Good. Enjoyed by us both, I will make this frequently

Friday, July 17, 2020

Chicken with Pear and Sage


  • 2 boneless skinless chicken breast halves
  • 2 tsp olive oil
  • thin slices Emmentaler or Gruyere cheese (about 1.5 oz total)
  • 1 small pear, cored and cut into thin slices
  • 1/4 C apple juice
  • 1 Tbsp finely shredded fresh sage
 1.  Place each chicken piece between 2 pieces of cling film.  Working from the center to the edges, pound lightly with the flat side of a meat mallet to 1/4 inch thickness.  Remove plastic wrap and sprinkle the chicken with salt and pepper.
2.  In a medium skillet heat oil over medium heat.  Add chicken; cook for 4 to 6 minutes or until chicken is tender and no longer pink, turning once.  Transfer to two dinner plates; top with cheese.  Cover and keep warm.
3.  In the same skillet cook and stir pear slices for 2 to 3 minutes or just until tender.  Add apple juice and sage.  Bring to boiling, scraping up any crusty brown bits from bottom of skillet.  To serve, spoon the pear mixture over chicken.

Robyn's notes: Good and quick.  There were a few bites where the sage was a little strong, it's not a flavour everyone likes, but it was mostly well balanced.  I used Gruyere (which it's been impossible to get for months, don't know how I lucked out this time) and the strength of the cheese against the sweet pear worked well.

*** 3 Stars: Good. At least one of us liked this enough for me to make it again, but not often

Thursday, July 16, 2020

Sweet and Spicy Turkey Skillet


  • 1 8oz turkey tenderloin
  • 1/4 C apple juice
  • 2 Tbsp bottled hoisin sauce
  • 1/2 tsp grated fresh ginger (see notes, below)
  • 1/8 tsp salt
  • dash cayenne pepper
  • 1/2 C thin, bite-size strips red, green, and/or yellow sweet pepper
  • 1 small onion, cut into thin wedges
  • 1 Tbsp cooking oil
  • 3 Tbsp cold water
  • 1 tsp cornstarch
  • 1 small apple or pear, peeled, cored, and cut into wedges
1.  Cut turkey tenderloin in half horizontally to form two 1/2 inch steaks; set aside.  In a small bowl, stir together apple juice, hoisin sauce, ginger, salt, and cayenne; set aside.
2.  In a large skillet cook sweet pepper strips and onion wedges in hot oil over medium-high heat for 4-5 minutes or until nearly tender.  Remove vegetables, reserving oil in skillet.  Add turkey to oil in skillet.  Cook about 4 minutes or until brown, turning once.
3.  Return cooked vegetables to skillet.  Add apple juice mixture.  Bring to boiling; reduce heat.  Simmer, covered, for 8 to 10 minutes, or until turkey is done.
4.  Using a slotted spoon, transfer turkey and vegetables to a serving platter, reserving liquid in skillet.  Cover and keep warm.
5.  Combine water and cornstarch; add to liquid in skillet.  Cook and stir until thickened and bubbly.  Add apple.  Cook, covered, about 3 minutes more or just until apple is slightly softened.  Spoon apple mixture over turkey and vegetables.

Robyn's notes: I was really exceptionally pleased with this, I thought it would be just "ok" for me and that he would really enjoy it, but turns out I liked it a ton.  I'd not used hoisin sauce before, but I was able to plan more recipes to use it, so keep an eye out for those, coming up.  I used ground ginger, because the weirdest things are selling out at this point in the pandemic (can't get frozen mango for love nor money around here, and I could get it easily three months ago, and Golden Delicious apples are an impossibility these days).  I measured generously, because ground herbs and spices are not as strong as their fresh counterparts.  I used a pear, just because apples are getting hard to come by and I wanted to use what I could get to make applesauce.  I did not cook as long as these instructions direct, because I was using my enameled cast iron skillet, which retains heat like crazy.  The turkey would have been bone dry if I'd cooked it for that long.  So I did about 3 minutes in the oil, turning once, and simmered about 6 minutes, at the most, slicing through to check for doneness.  I'm glad I pulled it when I did, it was perfect.  Thickness of the turkey will have a lot to do with this, I sliced it butterfly style so it was fairly thin.  

**** 4 Stars: Very Good. Enjoyed by us both, I will make this frequently
(Bonus: the Welsh for "apple juice" is "sudd afal")

Friday, July 10, 2020

Rosemary Chicken

  • 6 oz boneless skinless chicken breast
  • 1 small garlic clove, minced 
  • 1/2 tsp dried rosemary
  • 1/8 tsp black pepper
  • salt to taste
  • 1/2 Tbsp olive oil
  • 1 Tbsp lemon juice 
1.  Slice chicken into half-inch strips. Sprinkle with garlic, rosemary, pepper, and salt. 
2.  Heat olive oil in skillet. Sauté chicken until lightly brown, remove to serving plate.
3.  Add lemon juice to drippings in skillet, cook and stir for one minute. Drizzle over chicken.

Robyn's notes: the lemon juice really comes along from behind with each bite, it was surprising but tasty. Be sure not to overdo it on the cooking oil; since the sauce is made of the drippings, if you use too much oil to begin with it'll be an oil slick on the plate.

*** 3 Stars: Good. At least one of us liked this enough for me to make it again, but not often

Tuesday, July 7, 2020

Caribbean-Style Chicken


  • 1/2 tsp allspice
  • 1/4 tsp dried thyme
  • 1/4 tsp paprika
  • 1/8 tsp hot pepper sauce
  • 1 tsp olive oil
  • 1 tsp lime juice
  • 2 boneless skinless chicken breast halves
1.  In a small bowl, combine all ingredients except chicken; mix well. Rub mixture on chicken breast halves. Let stand at room temperature for 15 minutes to marinate.
2.  Spray broiler pan with nonstick cooking spray, place chicken on spray-coated pan. Broil 4 to 6 inches from heat for 8 to 10 minutes or until chicken is fork tender and juices run clear, turning once.

Robyn's notes: very simple, and it's good to have a couple recipes that require a very short marinade, for when you've forgotten to prepare anything or when plans change last minute. The original recipe source when this was a larger yield called it just "Caribbean Chicken", but even I know that people in that region wouldn't claim this recipe resembles their dishes, so I've added the modifier. I added the green onions for visual balance. Definitely needs the hot sauce.

*** 3 Stars: Good. At least one of us liked this enough for me to make it again, but not often

Sunday, July 5, 2020

Chicken with Peanut Barbecue Sauce


  • 1/4 C spicy barbecue sauce
  • 3 Tbsp apple juice 
  • 2 Tbsp peanut butter 
  • 2 boneless skinless chicken breast halves
1.  In small saucepan, combine barbecue sauce, apple juice, and peanut butter; blend well. 
2.  Place chicken on broiler pan. Broil 4 to 6 inches from the heat for 10 to 14 minutes or until chicken is fork tender and juices run clear, turning once and brushing with sauce mixture during the last 5 minutes of cooking time.
3.  Bring remaining sauce mixture to a boil; serve with chicken.

Robyn's notes: this is so simple and tasty, great for a busy evening. I sometimes add just the tiniest dash of crushed red pepper, if the barbecue sauce I have on hand isn't spicy. I know I made this for the first time in 2001, because my mom was doing Weight Watchers then, and when I cooked for her I'd note the points value of the recipe. This one had "ww6" written on it (old points system).

**** 4 Stars: Very Good. Enjoyed by us both, I will make this frequently

Saturday, June 27, 2020

Brown Sugar Mustard Chicken


  • 2 Tbsp Dijon mustard
  • 1 1/2 Tbsp packed brown sugar
  • 1/8 teaspoon ground allspice
  • Dash crushed red pepper flakes
  • 2 boneless skinless chicken
1.  In a medium bowl, mix mustard, brown sugar, allspice and pepper flakes. Reserve about 1 Tbsp mixture for serving. Add chicken to remaining mixture; toss to coat.
2.  Grill chicken, covered, over medium heat or broil 4 in. from heat 6-8 minutes on each side or until a thermometer reads 170°. Serve with reserved mustard mixture.

Robyn's notes: this was so very simple and straightforward, and it was another recent recipe which I thought would be too mustardy but wasn't.  I broiled the chicken, instead of grilling, I leave grilling to my sweetheart because he's better at it than I am.

*** 3 Stars: Good. At least one of us liked this enough for me to make it again, but not often

Wednesday, June 24, 2020

Molasses-Glazed Pork Tenderloin


  • half of a 12oz pork tenderloin
  • 2 Tbsp finely chopped prosciutto or bacon
  • 1 1/2 C frozen lima beans or green beans
  • 1/4 C chopped onion
  • 1/3 C water
  • 1 1/2 tsp olive oil
  • 1/4 C orange juice
  • 4 1/2 tsp molasses
  • 1/2 tsp cornstarch
  • 1/4 tsp salt
  • 1/8 tsp black pepper
1.  Trim fat from meat.  Cut meat into 1/2 inch slices, set aside.  In a large skillet cook prosciutto over medium heat until crisp.  Drain, discarding drippings.  In the same skillet, add frozen lima beans and onion; cook in water according to bean package directions.  Drain bean mixture, set aside.
2.  In the same skillet, heat oil over medium-high heat.  Add meat to skillet.  Cook for 5 to 7 minutes or until meat is just barely pink in the center, turning once.
3.  Meanwhile, in a small bowl, stir together orange juice, molasses, cornstarch, salt, and pepper.  Add to the meat in skillet  Cook and stir until thickened and bubbly.  Cook and stir for 2 minutes more.  Stir the bean mixture into the orange juice mixture; heat through.
4.  Serve the sauce over the meat.

Robyn's notes: I can't eat lima beans or green beans (or onions, for that matter), so I just skipped that part.  This is good when you have already used half of a pork tenderloin and have the other half to use, check the "beef pork or lamb" label in the sidebar for pork tenderloin recipes. I used bacon, because I had it in the house for another recipe and it's better for the budget than prosciutto, as much as I like prosciutto.  I was surprised that the sauce didn't get thicker, I assumed that with both molasses and cornstarch it would set up fast, which it didn't.  But the end result was tasty.

*** 3 Stars: Good. At least one of us liked this enough for me to make it again, but not often

Tuesday, June 23, 2020

Satay-Style Beef with Couscous


  • 1/3 C chicken broth
  • 1/4 C creamy peanut butter
  • 1 Tbsp reduced-sodium soy sauce
  • 1/8 tsp ground ginger
  • 1/8 tsp crushed red pepper
  • 1 Tbsp dry sherry (see note, below)
  • 2 cloves garlic, minced
  • 1/2 tsp curry powder
  • 6 oz beef flank steak or boneless beef top sirloin steak
  • nonstick cooking spray
1.  In a small bowl, gradually whisk or stir the broth into peanut butter until smooth (mixture may stiffen at first, but will become thinner as more liquid is added).  Stir in soy sauce, ginger, and crushed red pepper, set aside.
2.  In a medium bowl, combine the sherry, garlic, and curry powder.  Trim fat from meat.  Cut meat into thin bite-size strips.  Add the meat to sherry mixture, toss to coat.
3.  Lightly coat a medium skillet with cooking spray.  Heat skillet over medium-high heat.  Stir-fry meat in hot skillet for 2 to 3 minutes or until meat is slightly pink in center.
4.  Add sauce.  Cook and stir about 1 minute more or until heated through.  Serve the meat mixture over couscous.

Robyn's notes: I don't keep sherry in the house, because everything I've ever read says not to use cooking sherry due to the sodium, and I won't use it up quickly enough to justify the expense of regular sherry.  So I used balsamic vinegar.  There are several ways to substitute for sherry in a recipe, depending on what else is in the recipe, in this case the balsamic worked out just fine.  This was tasty, though I found the meat a bit tough.

*** 3 Stars: Good. At least one of us liked this enough for me to make it again, but not often

Friday, June 19, 2020

Citrus Chicken


  • two 4oz skinless, boneless chicken breast halves
  • 1/8 tsp salt
  • 1 tsp cooking oil
  • 1 medium orange
  • 1 Tbsp orange marmalade (see note, below)
  • 1/8 tsp ground ginger
  • dash crushed red pepper (optional)
1.  Sprinkle chicken with salt.  In a medium skillet cook chicken in hot oil over medium heat for 8 to 10 minutes or until chicken is done, turning once.
2.  Meanwhile, finely shred enough of the orange peel to measure 1/4 tsp; set aside.  Peel orange. Cut orange in half lengthwise; cut crosswise into slices.  In a small bowl, combine shredded peel and orange slices. Add orange marmalade, ginger, and if desired, crushed red pepper; toss gently to coat.
3.  Remove cooked chicken from skillet, cover and keep warm.  Reduce heat to low.  Add orange mixture to the skillet.  Cook and stir for 30 to 60 seconds, or until marmalade is melted and mixture is heated through.  Serve the orange mixture over chicken.

Robyn's notes: When I was making my shopping list, I noted that Mustard-Orange Pork Tenderloin called for either orange marmalade or apricot preserves.  I don't really enjoy orange marmalade, but I do like apricot preserves, so I decided to use that.  I also used apricot preserves for this recipe.  It came out just fine with that change.  This was quite good.

*** 3 Stars: Good. At least one of us liked this enough for me to make it again, but not often

Thursday, June 18, 2020

Mustard-Orange Pork Tenderloin


  • half of a 12oz pork tenderloin
  • 1 Tbsp apricot preserves (or orange marmalade)
  • 2 tsp Dijon mustard
  • nonstick cooking spray
  • 1 C sliced fresh mushrooms
  • 1/4 C sliced green onions
  • 1 Tbsp orange juice
1.  Trim fat from meat.  Place meat in a shallow roasting pan.  Insert an oven-safe thermometer into center of meat.  Roast in a 425°F oven for 10 minutes.
2.  In a small bowl, stir together apricot preserves and mustard.  Spoon 2 teaspoons of the mustard mixture over the meat; set remaining mustard mixture aside.  Roast for 15 to 20 minutes more, or until the thermometer registers 160°F.
3.  Meanwhile, lightly coat a medium saucepan with cooking spray.  Heat over medium heat.  Add mushrooms and green onions to saucepan.  Cook and stir for 2 to 3 minutes or until mushrooms are tender.  Stir in the orange juice and remaining mustard mixture.  Cook and stir until heated through.
4.  To serve, thinly slice meat.  Spoon the mustard mixture over meat.

Robyn's notes: this was quite easy, and actually tastier than I expected.  The sauce mixture smelled so strongly of mustard that I expected that flavour to be overwhelming, but it turned out to have a nice balance.  That said, the meat was way too dry.  My thermometer is accurate, so I think if making this again I would pull it a couple degrees early and let carry-over get it the rest of the way. 

*** 3 Stars: Good. At least one of us liked this enough for me to make it again, but not often

Wednesday, January 31, 2018

Sirloin Steak with Balsamic Mushrooms

As a careful shopper, I got the smallest sirloin steak available at my market in order to make Sweet & Salty Beef Salad, which meant I had 8oz remaining after making the salad.  I went digging through my recipes and found this little dish, which only required the purchase of mushrooms--the rest of the ingredients were already in the house!  That's how we keep from wasting food!
  • 2 tsp + 1 Tbsp balsamic vinegar, divided
  • 1 medium garlic clove, minced
  • 1/2 tsp dried oregano, crumbled
  • 1/8 tsp pepper
  • 8 oz boneless sirloin steak, trimmed of fat, halved
  • 2 tsp olive oil, divided
  • 6 oz button mushrooms, sliced
  • 1/4 C beef broth
1.  In a medium (nonmetallic) bowl, stir together 2 tsp vinegar, garlic, oregano, and pepper.  Add steak, turning to coat.  Cover and refrigerate at least 30 minutes or up to 8 hours, turning several times if marinating longer than 30 minutes.
2.  In a large skillet, heat 1 tsp oil over medium-high heat, swirling to coat the bottom.  Cook steaks for 4-5 minutes on each side, or until browned and of desired doneness.  Transfer to plates.  Cover with foil to keep warm.
3.  In the same skillet, heat the remaining 1 tsp oil, swirling to coat the bottom.  Cook mushrooms over medium heat for 2-3 minutes, or until they start releasing their juices.  Pour in the remaining 1 Tbsp vinegar and the broth, scraping to dislodge any browned bits.  Cook for 5 minutes, or until most of the liquid has evaporated, stirring occasionally.  Serve over the steaks.

Robyn's notes: this is actually a fairly low-cal dinner!  Each serving of steak with mushrooms will be about 200 calories (try to use beef broth without extra salt and fat-free if you can find it).  This would go well with a spinach salad and maybe some garlic toast.  Watch me demonstrate this recipe on youtube!

*** 3 Stars: Good. At least one of us liked this enough for me to make it again, but not often

Wednesday, January 24, 2018

Sweet & Salty Beef Salad

A filling dinner salad with just 340 calories, this will help keep you on track, starting the year on the right foot!
  • 1 1/2 Tbsp reduced-sodium soy sauce (or fish sauce, if preferred)
  • 1 1/2 Tbsp brown sugar
  • 1/2 head iceberg lettuce, halved, cored, and thinly sliced
  • 2 tsp canola oil, divided
  • 8 ounces sirloin steak, trimmed of fat and thinly sliced
  • 1 jalapeño or serrano pepper, seeded and minced
  • 1 small onion, finely chopped
  • 1 clove garlic, minced
  • 1 orange, peel and white pith removed, coarsely chopped
  • 2 Tbsp chopped fresh cilantro (optional)
  • 1 Tbsp chopped dry-roasted peanuts
1.  Stir soy sauce (or fish sauce) and brown sugar together in a small bowl and set aside.  Divide lettuce between two plates.
2.  Heat 1 tsp oil in a medium skillet over medium-high heat until shimmering but not smoking.  Add beef and cook, stirring, until browned on the outside and still pink inside, 1-2 minutes.  Spoon over the lettuce.  Add remaining 1 tsp oil, jalapeño (or serrano), onion, and garlic to the pan and cook, stirring, until fragrant, about 1 minute.  Add soy sauce mixture, remove from heat and stir in orange (and cilantro, if using).  Spoon the sauce over the salads and sprinkle with peanuts.

Robyn's notes: there is a prep time component to this, because the lettuce has to be sliced, the steak has to be trimmed and sliced, the pepper, onion, garlic, orange, and peanuts...a knife must be taken to all of them.  But once the ingredients are prepared, it moves quickly and the kitchen starts smelling like a dream right away (I love all citrus smells as well as the scent of soy sauce).  Watch me demonstrate this recipe on youtube!

*** 3 Stars: Good. At least one of us liked this enough for me to make it again, but not often

Wednesday, January 17, 2018

Coconut-Lime Chicken & Snow Peas

During the winter and over the holiday season, many of us eat a lot of rich, heavy meals.  Come January, a lighter entree is often very welcome.  This dinner salad is a good choice for those trying to keep to resolutions to eat more greens.
  • 1 C "lite" coconut milk
  • 1/4 C lime juice
  • 2 Tbsp brown sugar
  • 1/2 tsp salt
  • 8 oz chicken tenders
  • 4 C shredded romaine lettuce
  • 1 C shredded red cabbage
  • 1 C sliced snow peas
  • 2 Tbsp minced red onion
  • 3 Tbsp minced fresh cilantro (optional)
1.  Preheat oven to 400°F.  In an 8 inch square glass baking dish, whisk coconut milk, lime juice, brown sugar, and salt.  Transfer 1/4 C of this dressing to a large bowl and set aside.
2.  Place chicken in baking dish; bake until cooked through, about 20 minutes.
3.  Meanwhile, add lettuce, cabbage, snow peas, onion, and cilantro if using to the large bowl with the dressing; toss to coat.  Divide between two plates.
4.  Transfer the chicken to a cutting board and thinly slice.  Arrange the chicken slices on top of the salads.  Drizzle 1 Tbsp of the cooking liquid over each of the salads.

Robyn's notes: dinner salads are a challenge for me, because they include so many ingredients that I can't have.  This was a pleasant surprise, because the chicken was really good--I'd eat it with couscous or rice happily.  Watch me demonstrate this recipe on youtube!

*** 3 Stars: Good. At least one of us liked this enough for me to make it again, but not often

Tuesday, October 3, 2017

Barbecue Chicken Stromboli


Taking advantage of a few of our made-ahead items makes this go quickly!
  • 1 portion Pizza Dough, thawed if frozen
  • 1 portion Shredded Chicken Base, thawed
  • 3/4 C barbecue sauce
  • 1/3 C chopped red onion
  • 1/3 C chopped green pepper
  • 2 Tbsp chopped sweet pickles or banana peppers (optional)
  • 1 C shredded Monterey Jack cheese with peppers
  • 1 egg, lightly beaten
  • 1 Tbsp water
1.  Line a baking sheet with parchment paper; set aside.  Roll Pizza Dough into a 10"x12" rectangle.
2.  For filling, in a medium bowl combine Shredded Chicken Base, barbecue sauce, red onion, green pepper, and pickles if desired.  Spread filling on dough to within 1 inch of the edges.  Sprinkle with cheese.  In a small bowl combine egg and water; brush some of the egg mixture on edges of dough.  Roll up the rectangle; pinch dough to seal seams and ends.
3.  Place loaf, seam side down, on prepared baking sheet.  Brush with more egg mixture.  Cover loosely with cling film.  Let rise in refrigerator overnight.
4.  Preheat oven to 375ºF.  Remove cling film from loaf.  Using a sharp knife, cut a few slits in the top of the loaf for steam to escape.  Bake 30-35 minutes or until golden.  Cool slightly.  Cut into slices to serve.

Robyn's notes: I ought to have put more effort into pressing/rolling the dough into the right size rectangle, this was really bulging to burst.  But it was still tasty, and because of the overnight rest it just went straight into the oven to be served for dinner.  Watch me demonstrate this recipe on YouTube!

*** 3 Stars: Good. At least one of us liked this enough for me to make it again, but not often

Thursday, September 7, 2017

Cajun Chicken Pasta


Not only does this move quickly by using another batch of the chicken and the cheese sauce that we made earlier, but it's another recipe that can be made ahead and frozen, ready to thaw, cook, and serve! 
  • 3 oz dried bow tie pasta
  • 1 portion Cheese Sauce
  • 1 portion Shredded Chicken Base
  • 1/2 C frozen sweet pepper and onion stir-fry vegetables
  • 1/4 C milk
  • 1/3 C chopped roma tomato (one small)
  • 3/4 tsp Cajun seasoning
  • 1 clove garlic, minced
  • 1/4 tsp dried thyme, crushed
  • 1/3 C panko bread crumbs
  • 2 slices bacon, cooked, drained, and crumbled
  • 1 small clove garlic
  • 1/8 tsp paprika
  • 1/2 C shredded Cheddar and Monterey Jack cheese
1.  Preheat oven to 350°F.  Cook pasta according to package directions; drain.  Rinse with cold water until cool; drain again.  In a large bowl combine cooked pasta, Cheese Sauce, Shredded Chicken Base, frozen stir-fry vegetables, milk, tomato, Cajun seasoning, 1 clove minced garlic, and thyme.  Transfer pasta mixture to a 1-quart rectangular baking dish.
2.  For crumb topping, in a food processor or blender combine panko, bacon, 1 clove garlic, and paprika.  Cover and process until fine crumbs form.  Sprinkle shredded cheese and crumb topping on casserole.
3.  Bake, covered, for 30-35 minutes.  Uncover and bake 5-10 minutes more, or until heated through and golden.  Let stand 15 minutes before serving.

To make dish ahead: Prepare through Step 1.  Cover dish with foil, place entire dish in resealable freezer bag.  Seal and freeze up to 2 months.  To serve, thaw in refrigerator overnight, Preheat oven, and follow steps 2 and 3.

Robyn's notes: I really quite enjoyed this, and would definitely have it again.  If desired, you can add hot sauce when combining the main ingredients, that would make it too much for my taste.  Watch me demonstrate this recipe on youtube!

**** 4 Stars: Very Good. Enjoyed by us both, I will make this frequently

Wednesday, August 30, 2017

Chicken Pot Pies


Since we've made several components ahead of time, this goes together in a blink!
 1.  Preheat oven to 425°F.  For filling, in a large bowl combine frozen mixed vegetables, Shredded Chicken Base, Cheese Sauce, thyme, pepper, and salt.  Divide filling between two 10oz ramekins or custard cups.
2.  Divide Pastry Dough into two portions.  Roll each into a 6-inch circle (or size needed to top your baking dish).  Place pastry circles on filling.  Turn edges under, crimp as desired.  Using a sharp knife, cut a small cutout or a few slits in each pastry top to allow steam to escape.
3.  Place pot pies on a baking sheet and bake at 425°F for 30 minutes or until golden and bubbly.

Robyn's notes:  Nice and quick, and our pastry dough works quite well in this recipe.  Remember to use an unsweetened pastry dough here.  To make pot pies ahead, complete step 1, then cover with cling film and refrigerate until ready to bake.  Remove cling film and follow remaining steps.  Watch me demonstrate this recipe on youtube!

*** 3 Stars: Good. At least one of us liked this enough for me to make it again, but not often