Showing posts with label info. Show all posts
Showing posts with label info. Show all posts
Tuesday, August 13, 2019
Status
Just as I was prepping a new feature for this site and its accompanying YouTube channel, I had emergency surgery. Between the hospitalization and the recovery, I wasn't able to work on anything for Our Small Table for an extended period. About the time I was feeling up to it again, things got extra complicated, between my mom getting a cancer diagnosis and subsequently starting treatment, and an unusual summer with me travelling back and forth from one state to another. Then I moved, had serious vehicle issues, and my beloved mom passed away. The hope is that now that we're more properly settled, and I have a vehicle again, I'll be able to end the extended hiatus for Our Small Table. He's been talking about wanting to add gardening videos to the YouTube channel, so that's a possibility, and I have three videos already recorded for the new feature I was working on. I've also been testing small batch InstantPot recipes, and I have a few "just for fun" recipes planned (Firefly fans? Watch this space!).
Monday, October 30, 2017
Instant Pot Hard-Cooked Eggs

- 1/2 C water
- 6 large eggs
2. Close and lock lid of Instant Pot. Turn the steam release handle to "sealing" position. Press "Manual" and cook at High Pressure 9 minutes.
3. While eggs cook, fill a large bowl with cold water. When time is up, immediately open the cooker using Quick Pressure Release. Transfer eggs to cold water to stop the cooking process. Cool completely and store in refrigerator.
Robyn's notes: this is the only way I make hard-cooked eggs anymore, and I've been making tons of them since I started doing it this way. It's quick, I don't have to stand watching for the water to boil, and they cook exactly the way I want them to. I've also found that they've been peeling more easily than hard-boiled eggs, but that could be more a function of the eggs themselves than the cooking process. I fill the bowl with water and place it in the fridge while the eggs are cooking, so I don't have to bother with ice, taking it out just before the time is up. Remember that 9 minutes is the cooktime for my altitude, sea level will be lower (though not by much). Experiment to find your perfect time.
For my IP Mini, it's 3/4 C water and 7 minutes.
***** 5 Stars: Excellent. A favourite for both of us, I will make this repeatedly
Thursday, October 12, 2017
Allergy-Free Baking Powder

I know, it's astonishing that baking powder is yet another place that corn hides. But corn starch is there to stop the clumping, so many baked goods are a problem for those with corn allergies.
- 2 Tbsp cream of tartar
- 1 Tbsp baking soda
- 1 Tbsp tapioca starch
Robyn's notes: This can be easily sized up, just maintain the ratio of the ingredients. Give the container a good shake before using, just to be sure it's properly mixed. Watch me demonstrate this recipe on youtube!
**** 4 Stars: Very Good. Enjoyed by us both, I will make this frequently
Thursday, August 11, 2016
Kitchen Basics #3 -- Measuring

I've demonstrated the proper measuring process for a few ingredients, as well as showing why it makes a difference, in a video on youtube. Go check it out!
Here in the US, most people use volume measurements of Cups, Tablespoons, and teaspoons. This is easy and quick, but yes, the weight measures used in other countries are more accurate. Many professional bakers here use weights for that very reason, and now that kitchen scales are inexpensive, more home bakers are going that direction. I use both in my kitchen, but since US standard remains volume, all my recipes are written that way.
Three types of measuring equipment are needed for a standard home kitchen: a liquid measuring cup showing increments from 1/4 Cup to 1 Cup, a set of dry measuring cups, and a set of measuring spoons. I always make sure to have the "extended" set of measuring spoons, which includes both a 1/8 tsp and a 1/2 Tbsp. Since I make small dishes, I use those two far more than kitchens that regularly cook for 4 or more people. I have not found those sets difficult to buy or any more expensive. Dry measuring cups should have some heft to them, if the metal is too thin they may bend at the handle when you're using them, which can get messy and frustrating and means the possibility of spilling and inaccurate measures. Avoid any sort of lip where the handle meets the cup, as it's a great place for food particles to get trapped and for bacteria to form over time if not scrupulously cleaned. Measuring spoons are best if all one piece, whether that be metal or plastic--your preference--for the same reason. I keep two liquid measuring cups in the house, a 4 Cup and a 1 Cup, some people like to have a third, mid-range as well. The larger is not strictly necessary for most people, it's simply faster for measuring large amounts and I use it mostly when making jams to make sure I have the proper ounces of fruit pulp.
It is necessary to have separate dry and wet cup sets, though spoons are used for both. Wet measuring cups allow you to correct for the meniscus, or curve caused by surface tension. You may notice that when filling a dry measure with water, the water line can actually be higher than the top of the cup. This is more difficult to see and correct in a dry measure than in a wet. It's also far more difficult to get a liquid right up to the top of a dry cup and then transport that to the work station without spilling.
While it won't appear in my recipes because I find it less clear and because I don't often write recipes that call for so much butter, sometimes a recipe will reference a "stick of butter". As shown in the photo above, butter in the US is mostly sold in wrapped sticks, each of which is 1/2 Cup. On the wrapping is printed lines showing Tablespoon measures, 1/4 Cup, and usually 1/3 Cup. By simply slicing along the proper line, the needed amount of butter is measured out quickly and easily. If using Amish roll butter or other types that don't come in a stick form, the butter would be measured in a spoon or dry cup.
Ingredients like softened butter, shortening, peanut butter, or others of that consistency are measured in a dry cup, even if they are being used as a liquid in the recipe (for example, when creaming butter and sugar for making cookies, both those ingredients are considered liquids, both would use a dry cup). If measuring something very sticky, like peanut butter or molasses, giving the measuring cup a quick shot of cooking spray first can help release it later. Push the ingredient into the cup with a small spatula to fill all air pockets, spoon more in, repeat, and level off the top. Another option is one I've taken advantage of, which is a push-up measuring cup. This has a plunger action that pushes the ingredients out without leaving a bunch behind in the cup. I did a lot of reading of reviews before buying mine, and a lot of brands have complaints about how quickly the markings rub or wash off, making the item useless. I ended up purchasing the "Adjust-A-Cup" brand, from Amazon, and while I don't use it often and I only hand-wash (we don't have a dishwasher), I use it a lot during the holidays when I measure molasses for gingerbread and I've had it for 3 years without any loss of markings on the sides.
We have Fannie Farmer to thank for standardized measurements, as her Boston Cooking School Cook Book, published in 1896, introduced the concept, as well as being specific about level measures. Prior to her work, recipes generally called for ingredients in amounts compared to other objects, such as butter "the size of an egg". If you've ever seen eggs in the farmyard, you'll know that this can vary widely even if you're exclusively talking about chicken eggs, and any homemaker of the time could easily have interpreted that size to her own experiences, ending up with unsuccessful recipes. Farmer's work, and all the efforts of those at the Boston Cooking School in the culinary science field, have led directly to the success and understanding of food we enjoy today.
Monday, May 30, 2016
Now on YouTube!
I've been wanting for a long time to start uploading cooking demonstration videos, but had to wait until Google+ was uncoupled from YouTube. First video covers one of my more popular recipes, Small-Batch Chocolate Chip Cookies.
Monday, June 8, 2015
Explaining
There has obviously been a very long hiatus here. I'm not going to get too deeply into the reasons, but they're all health-related. My existing health problems have continued to worsen, and in ways that have had a serious impact on my diet. Originally, the site was temporarily closed because I was put on intravenous feeding only--nothing by mouth--for 12 weeks. If I'm not eating, I'm not cooking or developing recipes.
 When those 12 weeks were over, the IV feeding continued for another year, supplemented by eating in the usual manner. I was so ill, however, that I was not physically capable of cooking. So I did a lot of convenience foods and snacks like crackers (I fell in love with 34° Natural crispbreads). There have been a lot of other severe issues with my health, which all continue to the present day, but I am able to do some real cooking and baking here and there. When I'm having a good day, I tend to do some make-ahead dishes for the freezer, to make things easier on bad days. This past Xmas, my sweetie gave me a beautiful KitchenAid stand mixer, which I adore, and we have a garden now, so some canning and preserving is planned.
While I can't say that updates will be particularly regular (and most of what I made in the past couple years I took no pictures), I'm re-opening the site. Here's hoping for good days in the kitchen for a long time to come!

While I can't say that updates will be particularly regular (and most of what I made in the past couple years I took no pictures), I'm re-opening the site. Here's hoping for good days in the kitchen for a long time to come!
Tuesday, September 25, 2012
Spider

Generally, if someone told me there was a spider in my kitchen, my response would not be one of joy or excitement. In our house the eight-legged kind get liberated instead of decimated (unless a cat sees them before I do), and the wire kind shown above get waved happily around like a magic wand.
A spider is a fairly simple tool, a straight handle with a shallow wire-mesh basket at the end. It's not a kitchen necessity by any stretch of the imagination, everything it does can be done by other tools, but it's a great addition to your kitchen and it does its jobs better than the other options. If you're making a holiday wishlist, a spider might be a good thing to include.
The most common use for a spider is to lift and remove food from hot water or oil. Those of us who can and preserve can use it for moving blanched vegetables quickly from boiling to cold water. It's also a great tool for gnocchi and any stuffed pasta, which should ideally be lifted from their cooking liquid instead of being poured into a colander. Doing the latter can burst delicate pasta or crush gnocchi, while lifting them out individually with the spider is gentle enough to keep this from happening. Spiders are sometimes referred to as basket skimmers, because they are very useful for skimming foam from stocks and soups. Additional uses include fishing a bouquet garni or whole bay leaves out of a pot and deep frying foods.
Friday, July 27, 2012
Kitchen Basics #2 - Being Fancypants

The easiest way to make a meal more special is by changing the environment it's served in. Put down a tablecloth or placemats. If you don't have a tablecloth, as we didn't for a long time, fake it. Lay a square scarf, bandanna, or shawl down as if it were a cloth (or a rectangular scarf as a tablerunner). Clean cotton sheets can work as tablecloths for some tables (we have a round cafe table, so it's more challenging). Unfold a paper napkin completely and place it offset in the center of the table, so that two of the corners are pointing at your plates. If you're the kind of person who has fabric scraps (I'm a quilter and I sew, so I do), dig through and see if there's a fat quarter worth of material that you wouldn't be heartbroken to get grease on. Scrapbooker? Put a square of paper that you don't have plans for in the center of the table, or if you've got two that coordinate, put one under each plate as mats. If you've got a little extra cash, go buy a tablecloth or some mats. If you're crafty, make your own. Quilters and those who sew have a head start here, but all it really takes is straight cutting and sewing a reasonably straight hem. If you can afford it, it can be fun to have a few tablecloths or placemats that are themed for various holidays.
Whether you go the route of tablecloths/placemats or not, there are additional table changes that can make a real difference. Have a small centerpiece on your table from time to time. Fresh flowers are probably the best option, because they'll brighten up that whole section of the house as long as you keep them alive. Most people usually smile when they walk into a room that has flowers in it. If you're allergic or have a black thumb even for purchased daisies, grab some silk flowers at the craft store and stick them in a short vase. Short is the operative word here. You want to brighten up the table, not make it impossible to carry on a conversation because you can't see each other through foliage. If you're not particularly clumsy, a couple candles can also make a nice occasional centerpiece, especially sitting on a small mirror. Have a sense of humor about it. Fancypants does not mean stuffy. Why not make a Lego centerpiece? Or stick a tootsie roll pop bouquet into a favourite mug. The point is to add colour and interest and change to the table in a way that slows things down and makes you smile.
As often as possible, use napkins. I've made cloth napkins that match the decor of our eating nook, but we don't always use them, we sometimes just use paper napkins. The point is to have it there beside the fork, ready to be used. It completes the table setting. Which is another note I think is important. Place the entire table setting. Even if you know that neither of you will be using a spoon, put the spoons in their proper place on the table anyway. Sitting down to a set table with a napkin and beverage is a different experience from being handed a plate with a fork on it. It's not necessary to include salad forks and soup spoons and such, unless you're going all-out and having a Serious FancyPants Dinner with multiple courses. For a regular meal, the standard place setting should be as shown:

More standard ways to make a meal fancypants are by gussying up the actual food presentation. Put colour on the plate. Chicken breast over rice with a cream sauce is just white on white on white. Use tomato couscous sometimes, or spinach pasta. Choose a fresh vegetable or fruit side that's orange or yellow, something contrasting the rest of the meal. If you've got the inclination, grab a couple cheap squeeze bottles (often available, again, at the dollar store) and swirl or dot some sauce on the plate. It'll make you feel like a restaurant chef and whether it comes out well or not it should make you both smile. Use garnishes, there's nothing wrong with them if they're edible. If the budget is tight you can grow a couple small planters in your windowsill (parsley is a good all-purpose garnish for savory and mint for sweet--just don't plant mint directly in the ground unless you know what you're doing, as it has an extensive root system) and snip a couple leaves as needed. Many flowers are fully edible, as long as you know how they were grown (think about pesticides and sprays used for freshness in cut flowers at stores), including pansies and nasturtiums. Grate fresh cheese over the top of dishes at the table; pick up a small pepper grinder and add that last seasoning tableside. If it's something you'd enjoy taking the time with, appetizers or amuse bouches set the tone for a luxurious meal from the start. If you drink alcohol, wine or cocktails can be a nice addition. Serve a plated dessert now and then.
From here we move into the parts of a fancypants meal that are some of the bonus aspects of being a small household. Everything I've written above is easy and relatively cheap regardless of how many people are sitting around the table. But there are some things that are easier and cheaper when there's just the two of you.
Most of us have sets of dishes. Whether we bought them, inherited them, received them as gifts, we mostly eat from dishes that have a cohesive look. But do we have to? Mix up your dishes. You don't have to eat off the same plates every night. Now, I'm a little weird about this, in that I like for all the plates on the table at a time to coordinate. But even with that being the case, the dishes we use on Monday don't have to be the dishes we use on Tuesday. Here's where this is great for two-person households: all you have to buy is two plates and you've got a whole new look to your meal. The dollar store often has dishes in different shapes and colours, so you could either pay $2 to change up one night's table, or conceivably get an entire week's worth of plates for less than $15. If you really feel like splurging, go to an upscale department store with a china department (or go online). Since people often have to purchase replacements for broken or chipped fine china, you can buy just two pieces of many designs, instead of a full set. My grocery store actually sells some dishes, and they have some square bowls that I love, along with those giant leaning spoons that are really appetizer holders. Thrift stores and garage sales are, of course, also options. Only needing to get a couple pieces frees up your options and keeps you from needing a second kitchen for storage.
Having only two people at the table makes it easier to give yourself permission to sometimes try more expensive ingredients in your meals. When you're cooking a specialty luxury dish, you only have to buy enough to serve two. Sushi fans will find it much easier to budget for two servings of otoro tuna than for four or six. Filet Mignon is often sold already portioned for two. Even such things as specialty nuts, olives, or cheeses are much easier to justify when you only have to buy a small amount. As a bonus, when you buy just a very small amount of something expensive, if it turns out that you just don't like it, it's not as big of a deal to leave it unfinished and have a slice of pizza instead. If you're serving 4-6 people, the ingredients for a fancy dish can run you upwards of $50. When you've put that kind of money into dinner, you're likely to feel that you just have to finish it, no matter what. If the ingredients for the same fancy dish cost you half as much, you can more easily allow yourself to consider it an unsuccessful experiment.
Many households have very busy schedules. The more people living in the house, the busier they tend to be. Lots of people have to contend with multiple work schedules, school schedules, after-school extracurriculars, clubs, errands, appointments, and visiting friends. This makes arranging dinner more challenging. When there are two people in the house, managing the time does get simplified quite a bit. It's easier to plan a nice dinner together from time to time, because there are only two schedules that have to be worked around. Only having to take into account the time constraints of two people allows dinner to be a more luxurious experience on occasion.
There are some surprising benefits to taking the time to make a meal a nice occasion, instead of just grabbing some plates and chowing down in front of the tv. You're much more likely to talk to each other if you're sitting at a table, especially if that table has been fully set and even decorated in some manner. Talking, having real conversations, is regularly cited as being important for all types of relationships, be they parent-child, friendships, siblings, but especially intimate partners. Taking the time to sit down to a meal together and talk about your day can have a real lasting effect on the long-term health of your partnership. Also, give some thought to how quickly you eat when you're at a sit-down restaurant versus a casual meal at home. You likely eat much faster at home, rushing through the meal to get the dishes out of the way and get on to the next thing you've got planned for the evening, even if that's just tv time. Slowing down when we eat doesn't just improve our enjoyment of the experience (it tastes better if you let the food touch your tongue, instead of just inhaling it!), but it's good for our physical health. People who eat slowly and fully chew their food have fewer digestive problems such as gas, reflux, constipation, etc. It can also be a part of a weight-loss plan, in that you're more likely to eat only as much as you need and stop when you're full if you eat slowly. The faster you eat, the more likely you are to eat until there's no food left. Personally, I think life is less stressful overall if you take time as often as possible to just take a break from everything else and sit down and eat a meal with no hurry and no interruptions. Let the phone ring if someone calls. Put your napkins in your laps. Tell a story and laugh at your eating companion's stories. Do it on a regular basis and it becomes something to look forward to, a moment of calm no matter how hectic things otherwise get.
One important note about being a little bit fancypants. If one person is in charge of the meals they either need to tell the other person that they're planning something special for dinner, or they need to do it only to make themselves happy. One should never spend money and time on elevating a meal experience solely for the praise or appreciation of someone else. Many of the things I've mentioned are small changes that, taken alone, will make a meal a little bit more fun or a little bit fancier. They may not be consciously noticed by the person who didn't put the time into them, and that's ok. On the other side, if many of these things are combined, it could make for a very fancy meal, which might be uncomfortable for an unwarned person who's used to very casual eating. Be fancypants to the level that is fun for you, and do it because it is fun. Tell your dining companion that you thought you'd "do things up special tonight". They may decide to make it even more special and contribute an idea of their own, or they may just grin and go along with it. Regardless, the point is to have a nice meal together.
The photo at the top of this entry is an example of a very simple fancypants side dish. I made Parmesan couscous and spooned it into an old heart-shaped mold (which I think was originally for jello), pressing it into all crevices. Then I turned it out onto the plate and lay a few celery leaves alongside (because I had celery in the fridge. If I'd had an herb within reach that related to the dish, I'd have used that so the garnish could be eaten), topping the heart with a small amount of grated Parmesan cheese. The white beneath the blue plate is an old Corningware plate turned facedown. The whole look took about a minute and a half to achieve, but made my sweetheart smile when he sat down.
Wednesday, July 25, 2012
Cookbook Review: Diabetes and Heart-Healthy Meals for Two

Author: American Heart Association and American Diabetes Association
Published: 2008 by The American Heart Association Consumer Publications
Available for Purchase: Amazon, Barnes and Noble, Powell's
Neither of us is diabetic, nor do we have heart problems, but I think the best way to keep those statements true is be careful before issues start.
There are more than 170 recipes in the book, in the following categories: Appetizers, Snacks, Beverages; Soups; Salads; Seafood; Poultry; Meats; Vegetarian Entrees; Vegetables and Side Dishes; Breads and Breakfast Dishes; Desserts. There is a very short (6 pages) introduction on making healthy food choices, and a double index that isn't fantastic because it lists the recipes first by name, then by "subject", and many of the subjects are the same as the chapter headings. It's just as easy for me to go to the first page of the poultry chapter and look at the recipe list that's printed at the start of the chapter with page numbers, as it is for me to go to the index, find the poultry section of the index, and look at that list of recipes. If the index were sorted more specifically, for example chicken vs turkey, that would be more useful. There are a few pictures in the center of the book, all in full colour, showing a total of 15 recipes.
Lots of recipes that look tasty, good nutritional information, and real "for two" recipes, none of that "freeze leftovers" nonsense that some small-yield cookbooks try. A couple recipes do call for "half a can" of diced tomatoes or whatever, which is frustrating, but most either use all of an ingredient or explain how you can purchase just half to begin with. There are a surprising number of processed ingredients in some of the recipes, and in order to make the nutritional analysis accurate you have to be careful to note that most of the ingredients required are "fat-free" or "low fat" or "low sodium" versions.
I've cooked from the book on several occasions, and have had good luck with everything I've tried, but for one soup that was far too heavily spiced. The dishes are good, filling, and the recipes are complete and easy to follow. Nothing so far has felt as if we're eating "light", there's no flavour lacking. Admittedly, I sometimes use a recipe but don't get the "fat-free" sour cream that it calls for, but mostly I follow their guidelines.
The vast majority of the entrees are in the 200-300 calorie range (some fall below that, a few go as high as 450 calories), and the sodium levels are generally amazingly low. There are a lot of options, and recently this has been a cookbook that I find myself checking fairly often. It's nice to have a good meal that is also relatively good for us.
Tuesday, July 17, 2012
Garam Masala
Garama masala is a blend of toasted ground spices used in South Asian cuisine, most especially in Northern India. As is the case with curry powder, different brands will have different amounts of the spices, and sometimes other spices added.
Many garam masalas will include black pepper, cinnamon, cumin, cloves, cardamom, and sometimes coriander. Because these spices quickly lose their aroma and strength once ground, it is best and most effective to use whole spices and create the mix as needed. In this case, the spices are toasted first, then ground together. Sometimes a liquid is added to make a paste. Bay leaves, nutmeg, garlic, or onion may be included. In store-bought garam masala, there is often a higher proportion of less expensive spices, sometimes including ground ginger and dried garlic.
The pre-made garam masala I have on hand includes coriander, black pepper, cumin, cardamom, and cinnamon.
GF - because garam masala is not a single spice, there is a very slight possibility of gluten in some brands. The McCormick company is very dependable on this subject and does not hide wheat on their labels (if it's there, it'll say "wheat", not "natural flavours"). At the time of this writing, McCormick garam masala is gluten-free, as are the vast majority of brands (I've yet to find one that isn't).
Sunday, July 1, 2012
Cookbook Review: Essentials of Cooking

Author: James Peterson
Published: 1999 by Artisan, my copy--with the cover shown above--published 2003
Available for Purchase: Amazon, Powell's, Barnes and Noble
This is a departure from the cookbooks I usually purchase, as it's not a specifically "cooking for two" or small-yield book, and it's not really even a cookbook. Truly, it's a cooking reference book, and if you've only got space for one on your shelf, this should be one of the top contenders for that spot.
This really does offer the "essentials", plus several new ideas that would never have occurred to me. The book starts with full instructions--including step by step photos--on peeling vegetables (each type of vegetable is demonstrated separately), and ends with preparing and braising a large rabbit. In between is everything from making tomato sauce to making chicken liver mousse; making french fries to cooking squid; poaching eggs to boning a whole round fish. And there are clear photographs for each and every bit. Even the 25 page glossary has some pictures, and it provides more than just definitions for each term. The entry for "steam", for example, defines what cooking in steam is, how to do it, when it is usually done (with cross-reference to earlier text), descriptions of the four main types of steamers available for purchase, a description of how to improvise your own steamer, and instructions for how to use two different types of steamers.
I've never had to fillet a salmon, because my sweetheart takes care of that aspect for me when he catches the fish. But I truly believe that if I were faced with a whole salmon, I could use the 19 photos here to take me from cutting away the fins to removing the pin bones. At the same time, there are instructions--I hesitate to call them recipes, as most give ratios, not measurements--for all sorts of dishes, and I could use this book to make mayonnaise, chunky vegetable soup, baked tomatoes with garlic and fresh basil, gnocchi, or any of 18 classic sauces for sauteed chicken.
Complete and sensible index, well-arranged table of contents, and colour-coded page numbers correlating to sections make it easy to find what's needed quickly. There was not a single technique that left me feeling a jump had been made from one step to the next, and anything that requires previous knowledge tells you which page to find that particular bit of knowledge on. For example, on "How to poach chicken in a pot", there are references to "to truss a chicken, page 146", "to core and section carrots, page 21", "to make a bouquet garni, page 31", and "to carve a roast chicken, page 149", plus the related glossary entry (poach) is listed so the reader knows where to go for more.
I am completely unsurprised that this guide was nominated for a James Beard award. It is a condensing of years of training for those of us who will never attend culinary school but want a solid foundation for our home cooking. As it says on the inner jacket: "Knowing how to execute a technique makes you efficient; knowing why you've chosen that technique makes you a master."
Sunday, June 17, 2012
Mango Sorbet

Without an ice cream maker.
I have to be careful about the kitchen appliances that I choose. Space and money are both limited, so anything that takes up room and has only one use is something I'm just not going to spend money on. Ice cream makers fall into that category. We don't eat ice cream very often, so it's not really a loss, if we had one I'd feel like we needed to justify it, and we'd eat ice cream more than we really want or need to. However, I do love sorbet, specifically peach or mango sorbet, and in the summer I treat myself to pints of them and eat them straight out of the carton with a spoon.
The problems with that are double. One is the price. They tend to run about $4 for a pint, and I consider that to be a lot for a snack or dessert. The other problem is the ratio of ingredients in store-bought sorbet. For the mango, for example, there is more water than any other ingredient, sugar being the next highest, then mangoes, followed by juice--from concentrate--of lemon, pumpkin, and carrot. Add "natural flavours" and pectin, and you've got a $4 cool treat. I'd really rather not have more water and sugar than fruit in my sorbet. So here's my alternative. Be aware that since no ice cream maker is required, you can't just leave it and forget about it, it has to be checked.
- 1/3 C water
- 1/3 C sugar
- 2 ripe mangoes
- 1 Tbsp lime juice
2. Peel mangoes and remove as much flesh as possible, placing all flesh into blender. Pour 1/3 C cooled syrup into blender over mango, add lime juice, and puree until smooth. Transfer mixture to a freezer-safe container with a removable lid.
3. Stir every hour for the first 2 hours, then every 45 minutes after that, for a total of 6-8 hours.
Yield: see notes below
Robyn's notes: The texture is not quite as smooth as what you would get from an ice cream maker, but for my taste it's perfectly fine. As I was doing the stirring, I tasted a bit of it from time to time, and really thought I'd have to throw it out and start again. It was quite sour, and I thought I had my simple syrup ratio off. In the morning it had all evened out. It's nowhere near as sweet as the store-bought stuff, and if you want really sweet sorbet you may want to increase the amount of syrup incrementally, but it tastes very mango-ey and I'm happy with it. I used an old Cool-Whip container, and my yield was 1-1/2 packed Cups or 12.5 oz (this is going to depend on the size of your mangoes and how much flesh you're able to get off of them, but expect to get around this much). So a bit less than the pint I'd get at the store, but mangoes were on special and I already had the lime so this cost me $1 to make and I feel good about what's in it. Now, don't go eating it all, one of my next recipes will call for some of it. I made this a second time, using a light syrup that I had cooked peach halves in for canning. Came out very well.
**** 4 Stars: Very Good. Enjoyed by us both, I will make this frequently
Monday, June 11, 2012
Kitchen Basics #1 - Emergencies
Internet guidelines are not a substitute for professional advice. I do not have a medical background, my first aid experience is past employment of more than a decade in law enforcement, with the accompanying Red Cross certifications. In case of emergency, call 911/Emergency Services or contact a physician as appropriate. If you are unsure of the severity of an injury or incident, contact Emergency Services. Over-cautious is better than the alternative.
I've had this post in bits and pieces for a few weeks now, and it was only today, when searching for statistics, that I discovered that June is National Safety Month. So an especially good time to be discussing the subject.
Accidents happen. According to the US National Safety Council, 54,500 unintentional injury deaths occurred at home in 2008, due to poisoning, falls, fires/burns, and choking. In 2009, 21.1 million unintentional injuries occurred at home. One of the best ways to avoid being one of these statistics is to be mindful in your actions, and the kitchen is a good place to start.
The most basic safety precaution is to have a properly stocked first aid kit in your home. Plenty of these are available to purchase as an already prepared kit, at Amazon, Target, WalMart, your local drugstore, or often your pharmacy. It's generally less expensive to buy an assembled kit than to put one together yourself, though doing it yourself can mean stocking more of some items, if you find a large enough container. Regardless of whether you buy one pre-made or create your own, here's a list--again from the NSC--of items to keep in it: Adhesive strip bandages in several sizes; Bandage compress; Sterile rolled/flexible bandages; Triangle bandages; Sterile bandage tape; Disposable latex and non-latex gloves; Scissors; CPR breathing barrier (face shield); Tweezers; Antibiotic treatment; Antiseptic wipes/towelettes; Germicidal hand wipes or alcohol-based hand sanitizer; Cold pack; Disposable bags; Non-prescription medication acetaminophen, ibuprofen, anti-diarrhea medicine, antacids, laxatives; First aid manual. It is also very useful to have a working fire extinguisher in the home, and once you've gotten one, an understanding of how to use it (read through the instructions when you buy the extinguisher, and review them periodically. Don't wait until you have a fire to try to figure it out).
Burns
A serious burn may appear charred black or dry and white. For serious burns, do not immerse the burn in water, as this can cause shock. Do not remove any clothing that is stuck to the burnt area. Elevate the burned body part, above the heart if possible. Cover the burn with a sterile nonstick bandage--just cover, don't fasten or tape, this is a temporary measure to protect the burn from bacteria and infection--do not put gauze or towels or any material that may stick to the wound onto the burn. Call emergency services and follow the instructions given while you wait for paramedics to respond. If the injured person would not need to be the driver, and you feel comfortable transporting them, proceed to the nearest emergency room.
Minor burns fall into two categories: 1st degree and 2nd degree. A 1st degree burn has skin which is usually red, often swollen, and may be painful. 2nd degree burns involve blisters, intensely red or blotchy skin, and severe pain and swelling. If a 1st or 2nd degree burn is large or covers substantial portions of the hands, feet, face, groin or buttocks, or is over a major joint, treat it as a serious burn and follow the instructions in the previous paragraph. Otherwise, cool the burn by holding the burned area under cool (not cold) running water for 10-15 minutes or until the pain eases. Another option is to immerse the burn in cool water or cover it with cold compresses. This is the best option if the pressure of running water increases pain to the burned area. Do not put ice on a burn. Cover the burn loosely with a sterile gauze bandage to keep air off the burn and protect the skin from infection. Do not use fluffy cottons or any material that may get lint in the burn. Take whatever over-the-counter pain reliever you usually use (aspirin, acetaminophen, etc.).
Do not apply egg whites, butter, or ointments to a burn. These are old wives' tales and can cause infection. Do not break blisters, as this can cause infection. Blisters will heal on their own.
Cuts
Serious cuts need emergency medical treatment. These include stabbing injuries, partial or complete digit loss, and deep cuts. If there is severe bleeding or blood spurting from the wound, apply direct pressure with a clean cloth while contacting emergency services for further instructions. If, after 10 minutes of direct pressure to an apparently less severe injury, the bleeding has not stopped, continue direct pressure and contact emergency services. In case of partial or complete amputation, control bleeding with direct pressure. If complete amputation, save the severed body part, wrap it in a clean damp cloth, place it in a bag, and place the bag in another bag filled with cold water (ice water if possible). Do not put the body part directly in water or directly on ice. Contact emergency services and follow their instructions. Keep warm, and do not try to push any partially severed body part back into place. In case of a stabbing injury, if the item is still in the wound, try to avoid touching it. Pulling it out will increase blood loss, and if it gets pressed further in, it can cause additional injury. As you're contacting emergency services, try to apply pressure with a clean cloth around the object. In all situations, do not remove the cloth if bleeding soaks through. Apply another cloth on top of the first and continue to apply pressure.
For less-serious cuts, the first thing to remember is that you are not in a professional kitchen or television reality show. You do not need to "power through" or ignore a cooking injury. Stop cooking and deal with the cut, turning off all heating elements. Better a poorly-finished meal than a poorly-dressed injury that leads to an infection. Stop the bleeding by applying direct pressure (preferably elevating the injury) with a clean cloth for 20 minutes. Do not lift the cloth to check whether the bleeding has stopped, as this may interrupt the clotting process. Once bleeding has halted, rinse the wound with clear water. If there are any particles in the wound after rinsing, use alcohol-soaked tweezers to remove them carefully. Apply an antibiotic cream and cover the wound with a bandage. A wound that is more than 1/4 inch deep or has muscle or fat protruding will probably need stitches. Contact your physician or urgent care if one is available, as soon as possible (it's best to get stitches within hours of the injury). If the cut is located on a joint where the wrapping is likely to get loosened as you finish cooking, consider wearing a non-powdered latex glove on that hand, both to protect the cut from food (imagine lemon juice or salt making their way into your wound) and to protect the food from your cut. If the injury has dampened your enthusiasm, yield for the time being, wrap up any food that can go into the fridge, discard the rest, and go for pizza or something. There is no shame in not wanting to continue when you're hurt and demoralized.
Fires
"When in doubt, just get out."
I've been present for two house fires. One was a kitchen fire caused by my boyfriend-of-the-time putting a plastic colander in the oven when he couldn't remember which cupboard it belonged in. When I later preheated the oven without looking inside first, the plastic melted and then caught fire. Upon smelling the burning plastic, I checked the oven, and flames came shooting out at me, so high that they were inches from the ceiling. The other was when neighbor children were playing with firecrackers and set the side of our apartment on fire. Fortunately I had my window open and heard the crackling of the flames (which were literally inches away from where I was sitting and were climbing the wall, the fence, and the wooden telephone pole). In the first instance, I felt confident handling the fire myself, and I did. In the second, I knew it was far beyond my control, so I evacuated while calling 911 on my cell phone. If you doubt your ability to control a fire for any reason, get everyone out of the house to safety and call emergency services.
In case of a fire in the oven or microwave, keep the door shut and turn off the appliance. Do not open the door. Fire needs oxygen, and it will burn through what's inside, suffocating the fire. Opening the door provides the fire with more oxygen, and flames will pour out to consume the air in the kitchen. If smoke continues, or if you'd like confirmation that the fire is out, call the fire department. After I dealt with my long-ago oven fire, I called the fire department and asked them to come out and check for extensions. We were living in an apartment at the time, and I wanted to be sure the fire hadn't gotten into the walls or ceiling where it would endanger other residents. Just because the fire was out on my side didn't necessarily mean it hadn't found a way into another apartment.
In case of fire in a pan, use an oven mitt to cover the pan with its lid, move the pan off the burner, and turn off the stove. If you can't safely cover the pan with its lid, or you don't have a lid for that pan, use your fire extinguisher. Aim the extinguisher at the base of the fire, not at the flames. For a grease fire, DO NOT use water, as it repels grease and will likely splatter the grease, spreading the fire. If covering the pan is not an option for a grease fire, pour lots of salt or baking soda onto the fire to smother it. Never flour, as flour can explode and seriously increase your fire problems. If salt or baking soda aren't available, smother the fire with a wet towel or use your fire extinguisher. Do not swat at a fire with a towel, apron, oven mitt, or similar. This is likely to fan the flames and spread the fire.
Again, if the fire is spreading or you are overwhelmed, get everyone out of the house and call emergency services.
Food-Borne Illness
The best way to deal with food poisoning is not to get it in the first place, which means being cautious, aware, and observant. If you do find yourself exhibiting the symptoms of food poisoning (generally diarrhea, nausea, abdominal pain; sometimes vomiting and/or dehydration), and if you are not a high-risk group, rest, drink plenty of liquids, and avoid anti-diarrheal medications that will slow the release of the bacteria from your system. If symptoms do not improve in 48 hours, if you are part of a high-risk group (the elderly, infants and young children, people with chronic illnesses), or if there is blood in your stool, contact your physician immediately.
If you suspect botulism, or if you think the food poisoning is from seafood or mushrooms, contact emergency services or proceed to an emergency room.
Safety Tips
Again, as I am not a medical professional, I cannot take responsibility for your in-the-moment decision making. If an incident has occurred, use your best judgement and contact emergency services or your physician when appropriate.
Kitchen Basics are reminders or refreshers for those who have been cooking a long time, and information for newer cooks who may not know to ask certain questions.
I've had this post in bits and pieces for a few weeks now, and it was only today, when searching for statistics, that I discovered that June is National Safety Month. So an especially good time to be discussing the subject.
Accidents happen. According to the US National Safety Council, 54,500 unintentional injury deaths occurred at home in 2008, due to poisoning, falls, fires/burns, and choking. In 2009, 21.1 million unintentional injuries occurred at home. One of the best ways to avoid being one of these statistics is to be mindful in your actions, and the kitchen is a good place to start.
The most basic safety precaution is to have a properly stocked first aid kit in your home. Plenty of these are available to purchase as an already prepared kit, at Amazon, Target, WalMart, your local drugstore, or often your pharmacy. It's generally less expensive to buy an assembled kit than to put one together yourself, though doing it yourself can mean stocking more of some items, if you find a large enough container. Regardless of whether you buy one pre-made or create your own, here's a list--again from the NSC--of items to keep in it: Adhesive strip bandages in several sizes; Bandage compress; Sterile rolled/flexible bandages; Triangle bandages; Sterile bandage tape; Disposable latex and non-latex gloves; Scissors; CPR breathing barrier (face shield); Tweezers; Antibiotic treatment; Antiseptic wipes/towelettes; Germicidal hand wipes or alcohol-based hand sanitizer; Cold pack; Disposable bags; Non-prescription medication acetaminophen, ibuprofen, anti-diarrhea medicine, antacids, laxatives; First aid manual. It is also very useful to have a working fire extinguisher in the home, and once you've gotten one, an understanding of how to use it (read through the instructions when you buy the extinguisher, and review them periodically. Don't wait until you have a fire to try to figure it out).
Burns
A serious burn may appear charred black or dry and white. For serious burns, do not immerse the burn in water, as this can cause shock. Do not remove any clothing that is stuck to the burnt area. Elevate the burned body part, above the heart if possible. Cover the burn with a sterile nonstick bandage--just cover, don't fasten or tape, this is a temporary measure to protect the burn from bacteria and infection--do not put gauze or towels or any material that may stick to the wound onto the burn. Call emergency services and follow the instructions given while you wait for paramedics to respond. If the injured person would not need to be the driver, and you feel comfortable transporting them, proceed to the nearest emergency room.
Minor burns fall into two categories: 1st degree and 2nd degree. A 1st degree burn has skin which is usually red, often swollen, and may be painful. 2nd degree burns involve blisters, intensely red or blotchy skin, and severe pain and swelling. If a 1st or 2nd degree burn is large or covers substantial portions of the hands, feet, face, groin or buttocks, or is over a major joint, treat it as a serious burn and follow the instructions in the previous paragraph. Otherwise, cool the burn by holding the burned area under cool (not cold) running water for 10-15 minutes or until the pain eases. Another option is to immerse the burn in cool water or cover it with cold compresses. This is the best option if the pressure of running water increases pain to the burned area. Do not put ice on a burn. Cover the burn loosely with a sterile gauze bandage to keep air off the burn and protect the skin from infection. Do not use fluffy cottons or any material that may get lint in the burn. Take whatever over-the-counter pain reliever you usually use (aspirin, acetaminophen, etc.).
Do not apply egg whites, butter, or ointments to a burn. These are old wives' tales and can cause infection. Do not break blisters, as this can cause infection. Blisters will heal on their own.
Cuts
Serious cuts need emergency medical treatment. These include stabbing injuries, partial or complete digit loss, and deep cuts. If there is severe bleeding or blood spurting from the wound, apply direct pressure with a clean cloth while contacting emergency services for further instructions. If, after 10 minutes of direct pressure to an apparently less severe injury, the bleeding has not stopped, continue direct pressure and contact emergency services. In case of partial or complete amputation, control bleeding with direct pressure. If complete amputation, save the severed body part, wrap it in a clean damp cloth, place it in a bag, and place the bag in another bag filled with cold water (ice water if possible). Do not put the body part directly in water or directly on ice. Contact emergency services and follow their instructions. Keep warm, and do not try to push any partially severed body part back into place. In case of a stabbing injury, if the item is still in the wound, try to avoid touching it. Pulling it out will increase blood loss, and if it gets pressed further in, it can cause additional injury. As you're contacting emergency services, try to apply pressure with a clean cloth around the object. In all situations, do not remove the cloth if bleeding soaks through. Apply another cloth on top of the first and continue to apply pressure.
For less-serious cuts, the first thing to remember is that you are not in a professional kitchen or television reality show. You do not need to "power through" or ignore a cooking injury. Stop cooking and deal with the cut, turning off all heating elements. Better a poorly-finished meal than a poorly-dressed injury that leads to an infection. Stop the bleeding by applying direct pressure (preferably elevating the injury) with a clean cloth for 20 minutes. Do not lift the cloth to check whether the bleeding has stopped, as this may interrupt the clotting process. Once bleeding has halted, rinse the wound with clear water. If there are any particles in the wound after rinsing, use alcohol-soaked tweezers to remove them carefully. Apply an antibiotic cream and cover the wound with a bandage. A wound that is more than 1/4 inch deep or has muscle or fat protruding will probably need stitches. Contact your physician or urgent care if one is available, as soon as possible (it's best to get stitches within hours of the injury). If the cut is located on a joint where the wrapping is likely to get loosened as you finish cooking, consider wearing a non-powdered latex glove on that hand, both to protect the cut from food (imagine lemon juice or salt making their way into your wound) and to protect the food from your cut. If the injury has dampened your enthusiasm, yield for the time being, wrap up any food that can go into the fridge, discard the rest, and go for pizza or something. There is no shame in not wanting to continue when you're hurt and demoralized.
Fires
"When in doubt, just get out."
I've been present for two house fires. One was a kitchen fire caused by my boyfriend-of-the-time putting a plastic colander in the oven when he couldn't remember which cupboard it belonged in. When I later preheated the oven without looking inside first, the plastic melted and then caught fire. Upon smelling the burning plastic, I checked the oven, and flames came shooting out at me, so high that they were inches from the ceiling. The other was when neighbor children were playing with firecrackers and set the side of our apartment on fire. Fortunately I had my window open and heard the crackling of the flames (which were literally inches away from where I was sitting and were climbing the wall, the fence, and the wooden telephone pole). In the first instance, I felt confident handling the fire myself, and I did. In the second, I knew it was far beyond my control, so I evacuated while calling 911 on my cell phone. If you doubt your ability to control a fire for any reason, get everyone out of the house to safety and call emergency services.
In case of a fire in the oven or microwave, keep the door shut and turn off the appliance. Do not open the door. Fire needs oxygen, and it will burn through what's inside, suffocating the fire. Opening the door provides the fire with more oxygen, and flames will pour out to consume the air in the kitchen. If smoke continues, or if you'd like confirmation that the fire is out, call the fire department. After I dealt with my long-ago oven fire, I called the fire department and asked them to come out and check for extensions. We were living in an apartment at the time, and I wanted to be sure the fire hadn't gotten into the walls or ceiling where it would endanger other residents. Just because the fire was out on my side didn't necessarily mean it hadn't found a way into another apartment.
In case of fire in a pan, use an oven mitt to cover the pan with its lid, move the pan off the burner, and turn off the stove. If you can't safely cover the pan with its lid, or you don't have a lid for that pan, use your fire extinguisher. Aim the extinguisher at the base of the fire, not at the flames. For a grease fire, DO NOT use water, as it repels grease and will likely splatter the grease, spreading the fire. If covering the pan is not an option for a grease fire, pour lots of salt or baking soda onto the fire to smother it. Never flour, as flour can explode and seriously increase your fire problems. If salt or baking soda aren't available, smother the fire with a wet towel or use your fire extinguisher. Do not swat at a fire with a towel, apron, oven mitt, or similar. This is likely to fan the flames and spread the fire.
Again, if the fire is spreading or you are overwhelmed, get everyone out of the house and call emergency services.
Food-Borne Illness
The best way to deal with food poisoning is not to get it in the first place, which means being cautious, aware, and observant. If you do find yourself exhibiting the symptoms of food poisoning (generally diarrhea, nausea, abdominal pain; sometimes vomiting and/or dehydration), and if you are not a high-risk group, rest, drink plenty of liquids, and avoid anti-diarrheal medications that will slow the release of the bacteria from your system. If symptoms do not improve in 48 hours, if you are part of a high-risk group (the elderly, infants and young children, people with chronic illnesses), or if there is blood in your stool, contact your physician immediately.
If you suspect botulism, or if you think the food poisoning is from seafood or mushrooms, contact emergency services or proceed to an emergency room.
Safety Tips
- Keep knives sharp. Dull knives cause the user to apply more pressure, which means both less control and more force behind the knife if it does slip.
- Do not place sharp knives in the dishwasher. Not only is this bad for the knives (dulling them) and for other objects in the dishwasher (that can get knocked against the knives), but it's dangerous for people reaching into the dishwasher.
- Do not leave sharp knives in the bottom of the sink. People reaching into the sink, especially once it's filled with soap and water, may not see them.
- Do not gesture with knives in your hand.
- Do not use knives for anything other than their intended purpose (for example, knives are not meant to open jars/cans or plastic packaging).
- Do not dispose of broken glass in the regular trash where people reaching in can cut themselves.
- Use the handguard if you have a mandoline.
- Use oven mitts or pads every time you move things in or out of the oven.
- Pull long hair back while cooking, so that it doesn't get caught in anything or catch fire.
- Do not wear loose or flowing clothing when cooking.
- Keep flammable materials, such as pot holders and towels, away from the stove.
- Do not disable smoke detectors, and have them placed in sensible locations in your home to avoid constant false alarms.
- Keep pot handles pointed to the sides, where they won't get knocked into or snagged by movement in front of the stove. That can cause grease burns or water scalding.
- Have the dial gauge of pressure canners checked for accuracy by the local county extension every year.
- Do not use any canned food that bulges outward, has holes in it, or rust.
- Do not eat food if the freshness is questionable or it appears partially spoiled.
- Use separate cutting boards for poultry, meat, and vegetables.
- Do not eat wild-harvested mushrooms unless checked for safety by a mycologist.
- Do not use wild-harvested herbs that you cannot identify.
- Keep poisonous cleaning products and insecticides away from food preparation areas.
- Ask guests about food allergies before planning a meal.
- Change kitchen linen regularly to avoid breeding bacteria.
- Do not refreeze thawed frozen food.
- Take extra care with uncooked eggs and chicken.
- Leftovers should be cooled, properly packaged, and refrigerated within one hour. Do not put hot food directly into the fridge.
- Wash hands regularly.
- Fully wash cooking utensils and workstations between uses.
- Consider taking a basic first aid course, preferably one that includes CPR and Heimlich Maneuver instructions.
Again, as I am not a medical professional, I cannot take responsibility for your in-the-moment decision making. If an incident has occurred, use your best judgement and contact emergency services or your physician when appropriate.
Kitchen Basics are reminders or refreshers for those who have been cooking a long time, and information for newer cooks who may not know to ask certain questions.
Monday, June 4, 2012
Vanilla Sugar
I am a big fan of vanilla. The only scented body or hand soap I'll use willingly is vanilla, the only kind of scent or perfume I've ever used is vanilla, and just opening a jar of vanilla extract (real, please, not imitation) in another room is a great way to get me rushing in to look over your shoulder. I think it's unfortunate that the word "vanilla" has come to mean "plain" to so many minds, because true vanilla is anything but plain. Consider that vanilla is the seed pod of a tropical climbing orchid, and "plain" starts to go out the window. Vanilla Sugar is not a cheap product to make and have on hand, but I think it's worth the occasional splurge because of the way it elevates sweet baked goods.

2. Add seeds to the bowl of sugar, and use your fingers to rub the inside of the scraped bean with some of the sugar, to coax out any additional seeds that you may have missed while scraping. Stir together seeds and sugar to get the seeds as well mixed as possible.
3. Pour sugar and seed mixture into an airtight container, burying the bean in the sugar as well. It will take 1-2 weeks for the flavouring to infuse fully.
Yield: 2 Cups vanilla sugar
Robyn's notes: once the vanilla sugar has combined, it can be used in place of sugar in sweet recipes, without needing to adjust measurements. It's also good in coffee or tea, sprinkled on oatmeal or fruit, or as a simple but elegant gift-in-a-jar for friends who bake. To make this more cost-efficient, used beans work fine, too. If you've made a custard or sauce with a vanilla bean, you won't be eating the actual bean as part of that dish. So once you've removed the bean from its previous use, pat it dry gently and put it into the sugar. As the bean dries in the sugar, give the canister a shake from time to time, it'll break up any clumps that may have formed and help loosen any remaining "vanilla caviar" (the seeds) that may still be in the bean. In the photo above, I used half of a new bean and half a bean that had already been used for another purpose. Vanilla sugar can be stored indefinitely in an air-tight container, just as regular sugar can, and just needs to be topped off with additional sugar and more seeds or another bean as you use it up.

- 2 C granulated sugar
- 1 vanilla bean
2. Add seeds to the bowl of sugar, and use your fingers to rub the inside of the scraped bean with some of the sugar, to coax out any additional seeds that you may have missed while scraping. Stir together seeds and sugar to get the seeds as well mixed as possible.
3. Pour sugar and seed mixture into an airtight container, burying the bean in the sugar as well. It will take 1-2 weeks for the flavouring to infuse fully.
Yield: 2 Cups vanilla sugar
Robyn's notes: once the vanilla sugar has combined, it can be used in place of sugar in sweet recipes, without needing to adjust measurements. It's also good in coffee or tea, sprinkled on oatmeal or fruit, or as a simple but elegant gift-in-a-jar for friends who bake. To make this more cost-efficient, used beans work fine, too. If you've made a custard or sauce with a vanilla bean, you won't be eating the actual bean as part of that dish. So once you've removed the bean from its previous use, pat it dry gently and put it into the sugar. As the bean dries in the sugar, give the canister a shake from time to time, it'll break up any clumps that may have formed and help loosen any remaining "vanilla caviar" (the seeds) that may still be in the bean. In the photo above, I used half of a new bean and half a bean that had already been used for another purpose. Vanilla sugar can be stored indefinitely in an air-tight container, just as regular sugar can, and just needs to be topped off with additional sugar and more seeds or another bean as you use it up.
***** 5 Stars: Excellent. A favourite for both of us, I will make this repeatedly
Sunday, May 20, 2012
How to Whip Cream

Take a look at the ingredients list of a package of whipped cream. Don't have one nearby? Here's what I found on the side of a tub of Cool Whip: water, corn syrup, hydrogenated vegetable oil, high fructose corn syrup, sodium caseinate, natural and artificial flavor, modified food starch, xanthan and guar gum, polysorbate 60, polysorbate 65, sorbitan monostearate, sodium hydroxide, beta carotene. That's really not the slightest bit appetizing to me, and honestly I never have need of 8oz (more than 3 Cups) of whipped cream. Interestingly, it takes less time to whip cream from scratch than it does to drive to the store and buy Cool Whip, assuming you have heavy cream in the house.
- 1/2 C heavy cream
- 2 tsp granulated sugar
- 1/4 tsp vanilla
1. About 10 minutes before you plan to start, place a whisk and a medium metal bowl in the freezer so that they'll be cold when you begin.
2. Pour cream into bowl and begin whisking as quickly as you can keep up with. Be sure to rotate the bowl so that you access every bit of the cream.
3. As soon as you see the beginning of soft peaks forming (they'll look like wavy streaks), add the sugar and vanilla. Continue whisking until soft peaks have formed, being careful not to overwhip. The cream should hold its shape when dolloped onto something.
Yield: approx 1 Cup
Yield: approx 1 Cup
Robyn's notes: It's best to use a bowl that's somewhat deep, instead of one with a wide mouth, and keep in mind that the cream will about double in size, so pick a bowl that can accommodate that. I can't give estimates on how long to whisk each stage because I'm relatively weak from my health problems, so the speed at which I whisk may be completely different from what someone else would do. Just watch for the strength of the peaks and it should be fine. This should be used right away, but if it needs to be refrigerated for a couple hours, just give it another quick whisking before using, to re-incorporate it all. When I'm making an ingredient that calls for cream, I buy it in a one-pint carton and get a package of strawberries or raspberries or similar at the same time. Then, when I've used as much cream as I'll need for the recipe in question, I can whip up most of the rest of the carton into whipped cream and serve it on fruit (or even as part of a quick fruit shortcake). If you're used to Cool Whip, real whipped cream may not be sweet enough for your taste, in which case feel free to increase the amount of sugar incrementally until it's the way you like it.
***** 5 Stars: Excellent. A favourite for both of us, I will make this repeatedly
Thursday, May 3, 2012
Guide to Using Up Ingredients
I've added a page to the top of the blog entitled "Using Up Ingredients". This is a cross-reference of the recipes by certain ingredients, so that if you've made something that called for, say, 1/4 C of plain yogurt, and still have the rest of the container to use up, you can look up yogurt on that page and find other recipes that call for it.
The page is under construction, because it means I have to think of the ingredients that this is often a problem with, and search, list, and link each recipe for each, but it should be useful despite being incomplete.
The page is under construction, because it means I have to think of the ingredients that this is often a problem with, and search, list, and link each recipe for each, but it should be useful despite being incomplete.
Sunday, April 22, 2012
Food Holidays
I really enjoy so-called Food Holidays, and you'll see me providing recipes that fit them now and then. Obviously, none of them are actual US Holidays (partly because even federal holidays that are designated by Congress are technically not state holidays unless a given state chooses to participate). Some are official observances, designated by Congress, the President, or certain executive departments. These are generally calling attention to a food or food-related industry that's economically important to the US, which is why the US Department of Agriculture regularly selects foods to have their own special day.
As for the rest? Marketing. The pork industry can only get so far with slogans like "the other white meat" and "be inspired". Dairy farmers of America did great with "got milk?" but they need to remind the consumer of all the other things their cows produce. So their PR departments and marketing execs give us holidays that aren't holidays, excuses for us to eat their products and keep them in the forefront of our minds.
And I'm ok with that. There are more food holidays than there are days in the year, so we certainly don't celebrate all of them. At the beginning of the month I take a look at the food holiday calendar and if there's anything upcoming that I want to eat, I plan it for that dish's special day. In this house we enjoy our food, and silly little things like Lima Bean Respect Day (April 20th) are one more way to do that.
Tuesday, March 6, 2012
Cookbook Review: Healthy Cooking For Two (Or Just You)
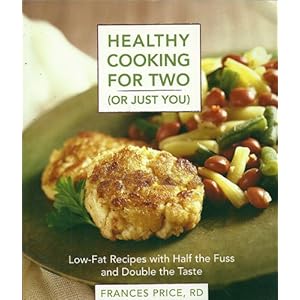
Author: Frances Price, R.D.
Subtitled: Low-Fat Recipes with Half the Fuss and Double the Taste
Published: 1995 by Rodale, re-released 1997 with a different cover but same contents
Available for Purchase: Amazon, Powell's
Within the first few months of purchasing this cookbook I had made around 50% of the recipes, and have since increased that to nearly 80%. There were only two occasions where we felt that a dish shouldn't go on the 'repeat' list, which is a great record, especially as compared to the other 'cooking for two' books I have. Great results come with basic skills, and the focus is on fresh ingredients as opposed to canned or frozen.
I love that this cookbook is focused on the recipes. There are two sections in the beginning with tips and techniques, and the occasional in-depth ingredient explanation fleshing out a recipe, but there is no space that's wasted that could better be devoted to recipes.
Each entry is listed in column format, with a column for the measurements to serve 1, and a column for the measurements to serve 2. A few recipes have a column for 2 and a column for 4, but they are the exception.
I never give cookbooks as gifts, because people have such different tastes and needs when cooking, but made an exception for this one. I bought a second copy for a friend and have considered buying copies for my sister and mom. All three households have two or fewer people and the variety of recipes would allow everyone to find dishes that satisfy them.
The only photo in the book is the one on the cover, so for those who need pictures of the completed dish to guide or inspire them, that may be a problem. This is actually the cookbook that cured me of that stumbling block, and I'm a better cook for it. Basic nutritional information is included for each recipe.
Recipes I've made from this cookbook:
Hong Kong Primavera with Spicy Peanut Sauce
Baked Potato Soup with Broccoli & Cheddar
Bachelor's Prize Chicken
***** 5 Stars: Excellent. A favourite for both of us, I cook from this repeatedly
Thursday, December 29, 2011
Product Review: Zoku Quick Pop

One of my xmas gifts this year was a Zoku Quick Pop Maker (Amazon link). It had been on my wishlist for quite awhile because one of the most frustrating things about my health problems is how often I have to be on a liquid diet. Liquid diets allow me to eat popsicles, but most popsicles don't have a lot of nutritional value, so I end up eating a Dreyer's Strawberry Fruit Bar once a day and drinking Ensure and juice the rest of the time. After a couple days of this, I am absolutely dying to chew things.
Enter the Zoku.
The point of the Zoku is that it takes ice cream maker technology and rearranges it to work for popsicles. The Zoku sits in the freezer empty (for at least 24 hours before you use it the first time, then just leave it in there between uses), then you remove it from the freezer, pour in the ingredients, and wait. 7 to 9 minutes later, you have 3 popsicles.
Now, I've read all the reviews, I know that the Zoku doesn't work fabulously with anything that has a low sugar content (or is made with artificial sweeteners), but I also know that I can use it to make a popsicle out of fruit juices or yogurt thinned with milk, and these are things that are staples of my diet when I'm not feeling well.
So far I've made four batches of popsicles with the Zoku. All have been edible, but there have been varied levels of success.
Batch one: strawberry Yoplait yogurt thinned with milk. Worked fine. Froze into a popsicle in about 8 minutes, wasn't terribly exciting but, then, strawberry yogurt isn't exactly the most exciting dish when it's in yogurt form.
Batch two: milk chocolate Ensure. I did this with the full expectation that it wouldn't work. Ensure is a nutritional drink (meal replacement), and while "sugar" is high on the ingredients list, the liquid consistency made me question its suitability for Zoku pops. I waited 11 minutes, then tried to remove the first popsicle I'd poured. It absolutely would not come out, which the instruction manual says is a sign that the sugar content is too low or the ingredients were too soft. I left that one alone, waited a 4 or 5 more minutes, then tried to remove the other two popsicles. Both came out fine. Again, they weren't exciting, but again the ingredient was something that isn't great when eaten in its usual form, so it wouldn't make sense to expect a popsicle made out of it to be fabulous. For the popsicle that wasn't to be, I filled the sink with hot water, placed the Quick Pop Maker into it, and the popsicle came out. The Quick Pop Maker had to refreeze for 18 hours or so after that intentional defrost before I could use it again.
Batch three: Naked Juice Power-C Machine. Another that I suspected might not work, because there's no sugar added. Since I love Naked Juices so much and I rarely get them (they're not cheap), I only filled one popsicle form with the juice. That way if it didn't work, I wouldn't have wasted the rest of the juice. Worked fine, froze in about 10 minutes. It was more noticeably tart as a popsicle than as a juice, but was still good.
Batch four: Kern's Strawberry-Banana with banana coins. Here I decided to branch out into the fancier popsicles. I sliced the banana coins very thinly, carefully placed them in the popsicle forms (difficult, because as soon as the banana touches the side of the form it freezes to it), then poured in the juice. It took about 14 minutes to freeze completely, but worked perfectly and tasted wonderful. The photo at the head of this entry is these strawberry-banana popsicles.
Overall, I'm very pleased with the Zoku. My biggest complaint is the need to separately purchase a popsicle storage container. Without that item, I have to either eat all three popsicles or make less than three at a time, because you can't leave the popsicles in the Zoku to eat later. Considering that a single serving of yogurt thinned with about 1/4 C milk (I didn't measure it) made 3 popsicles, it's not as if I'd be gorging myself to eat 3 at a time, but I would like to be able to eat one, then eat the next an hour later. Basically, the product is exactly what it's advertised as: a quick and easy popsicle maker.
No compensation received for this review, product was a gift from a family member and all ingredients were purchased by me. No endorsement by any named company is implied.
Saturday, November 12, 2011
Panko
Panko is a Japanese-style bread crumb, which is made from bread without crusts. Panko is coarser than the usual dried bread crumbs, airier, with larger flakes that tend to stay crispier longer. It also contains far less sodium, and doesn't generally absorb as much grease, so makes a good substitute for those trying to eat healthier.
Although several years ago it was difficult to find outside of Asian food stores, panko is now much more widely available and can usually be found near other packaged bread crumbs, or in some areas of the country in the Asian section of the store.
Although several years ago it was difficult to find outside of Asian food stores, panko is now much more widely available and can usually be found near other packaged bread crumbs, or in some areas of the country in the Asian section of the store.
Subscribe to:
Posts (Atom)